Saturday, November 10, 2018

WonderShare Filmora A Great Platform to Make Memes And Videos

WonderShare Filmora Meme Maker

Wondershare Filmora free online meme maker is great tool to maker is a great tool to make memes.You can create funny memes in just few minutes or seconds. This ia a great Platform to make memes online for free. It provides a facility to make memes in Pictures, Gifs, And Videos.
It Provides an easy way to make memes.You can also visit its website for assistance. 
You can download the software by using the given link

It has a very easy method to create Memes, trim videos and to edit videos
This is the site which provides you a lot of offers. You can get a lot of effects 
from its site 
Filmora meme maker is  great platform to create  memes online for free.
I also uses filmora to edit videos for youtube you can check these videos by clicking the link
The Platform that gives you a lot of things  for free is a great platform

It Provides you a lot of text animations and fonts by which you can show your video more elegant and stylish. You can also made a wonderful

Easy Steps to Create a Meme

 The meme is a simple photo or video with a witty tagline in the spirit of online commentary. It has been considered as a type of content designed and packaged to be spread with friends online. If you want to join in the fun, then you can always contribute to the web’s growing collection of memes. Here’s how:

Part 1: How to create a video meme

Besides the photo meme, you can also create a more vivid video meme. Wondershare Filmora (originally Wondershare Video Editor)is such a handy video editing tool which enables you to create your own meme in just three steps. You can download the software first and follow the steps below:


1Import your video or record a new one

Launch the software. Then choose from a 4:3 or 16:9 aspect ratio. After that, hit the “Import” button to load your video or click the “Record” button to record yourself via webcam. Click the red button to begin your video; when you’re done, click the button again to stop recording.
how to make meme

2Add caption and music to the video

Then place the video file on the timeline. Hit the “Text” button and choose from a text style you like. Enter the words and change the font, color and size of the caption.
Another thing you can try is insert a popular song in the background. To do this, just drag and drop the music file to the program and put it on the audio track of the timeline.
how to make meme

3Save and share your video meme

Of course, for a meme to be a meme, you need to get it lots of online exposure. It’s just that simple since you can directly upload your video meme to YouTube by clicking the “Create” button.
how to make a meme
So once you get a funny photo or video, think up something quirky and witty to caption it with and post it! Happy meme making!

Part 2: How to create a photo meme

If you want to create a photo meme, it might be wise to have Photoshop installed. But there are also some online meme creators that can help you on your way, and remove the need for any image editing on your part by creating them for you.
MemeCreator is one of such easy-to-use online meme creators recommended here. It includes just the tools you need to create a meme: fantastic ready-made meme templates and the tools you need to add captions. Here is a quick guide on how to create a photo meme with it:

1Browse over the existing memes to find the one you like

how to create a photo meme

2Add text as required via the form on the right hand side of the page

3Customize the meme as you like

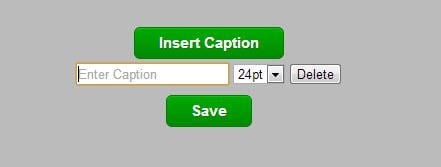
Hit "Insert Caption" if you want to add more texts to your meme. You can also click the drop down menu to change the size of the caption and drag-n-drop the caption box to change the position.

4Preview and save your meme

You see, this site is pretty straight-forward. And you can also appreciate hundreds of other examples already online. It’s pretty easy to get side-tracked.
Similar tools: Imgur Meme Generatorquickmeme and more.

Wednesday, October 31, 2018

Generations of Computers With Full Explanation From Start To End

Here you have got Generations of computers. This is most interesting topic which you are going to study. You can also download this file in the form of word document as link given below in the footer.


Generations of Computers 

1st 
Computers developed between 1946-1959, are the first generation of computer. They were large and limited to basic calculations. They consisted of large devices like the vacuum tubes. The input method of these computers was a machine language known as the 1GL or the generation language. The physical methods of using punch cards, paper tape, and magnetic tape were used to enter data in these computers.  
Examples of the first-generation computers include ENIAC, EDVAC, UNIVAC, IBM-701, and IBM-650. These computers were large and very unreliable. They would heat up and frequently shut down and could only be used for very basic computations.


2nd 
Computers developed between 1959-1965, the second-generation computers.
These computers were reliable and in place of vacuum tubes, used transistors. This made them far more compact then the first-generation computers. The inputs for these computers were higher level languages like COBOL, FORTRAN, etc. In these computers, primary memory was stored on the magnetic cores and magnetic tape and they used magnetic disks as secondary storage devices. 
Examples of the second-generation computers include IBM 1620, IBM 7094, CDC 1604, CDC, 3600, UNIVAC 1108. As a result, they worked on AC and therefore were faster than them predecessors.
 

3rd 
Computers developed during the period of 1965-1971, the third generation of computers. These computers differed from the first and second generations simply by the fact that the new circuit element like IC’s (Integrated Circuits) was used. An integrated circuit is a small device that can contain thousands and thousands of devices like transistors, resistance and other circuit elements that make up computer.      
Examples of the third-generation computers include IBM-360 series, Honeywell6000 series, PDP (Personal Data Processor), and IBM-370/168. 
 

4th 
Fourth generation of computers was between 1971-1980. These computers used the technology Very Large Scale Integrated (VLSI) circuits technology. 
They were also known as microprocessors. Intel was the first company to develop a microprocessor. First “Personal Computer” or PC. Developed by IBM, belonged to this generation. VLSI circuits had almost about 5000 thousand transistors on a very small chip and were capable of performing many high-level tasks and computations. These computers were thus very compact and thereby required a small amount of electricity to run.   
Examples are STAR 1000, CRAY-X-MP (Super Computer), DEC 10, PDP 11, CRAY-1. is generation of computers having the first “supercomputers” that could perform many calculations accurately. They were also used in networking and also used higher and more complicated languages as their inputs. The computer languages like languages like C, C+, C++, DBASE etc. were the input for these computers. 


5th 

This is the present generation of computers and is the most advanced one. The generation began somewhere around 1981 and is the present generation of computers. The methods of input include the modern high-level languages like Python, R, C#, Java etc. These are extremely reliable and employ the ULSI or The Ultra Large-Scale Integration Technology. These computers are the are the frontiers of the modern scientists' calculations and are used to develop the artificial intelligence all the components that will have the ability to think for themselves. 
Examples include: Intel P 4, i 3 – i10, AMD Athlon, etc. 
We have the most complete syllabus of quantitative aptitude in one place for you